Are you thinking of surprising someone with a homemade birthday cake this year? Try making a layer cake decorated with iced sugar cookies in whatever shapes the recipient may like, but go the extra mile and add their nickname in cookie form as well. Whenever I hear the term, "cookie cake", I think of either a layer cake or sheet cake with cookies attached to it. A flat chocolate chip cookie 'pizza' iced and decorated to look like a cake is not a cake in my opinion.

Having alphabet cookie cutters in one's pantry is a must if you are a cookie crafter, cookie baker and cake decorator. They allow you to spell out a person's name, a greeting or even their nickname. They come in various fonts and sizes, so pick and choose whatever you like, and then create personalized cookies or cakes.
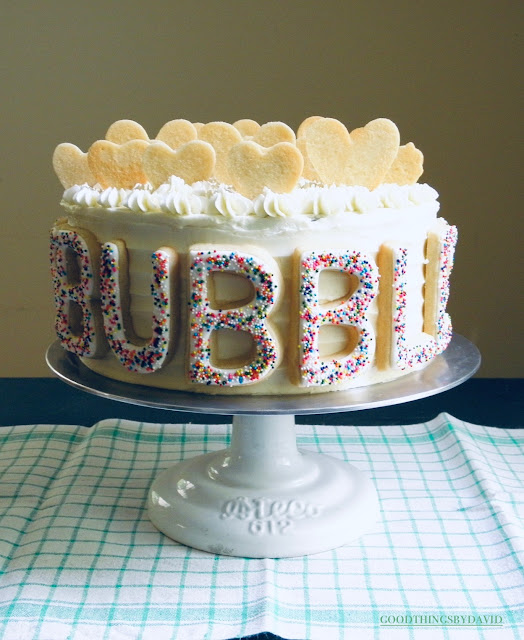
This past week I baked a delicious chocolate layer cake and iced it in delicate Swiss meringue buttercream. To this I attached royal icing cookies in the shapes of hearts and letters along the sides of the cake, and on the top.
Take a look at how easy, yet showstopping a cookie layer cake like this can be.


I simply adored making this cake because it was for a very special person. Everyone who saw it at work said that it looked too pretty to eat. But, do you know what I thought?

I thought it was too good not to dig into as soon as I was done photographing it. :-) By the way, my friend Kelly loved every bit of it.
Happy Birthday Bubbles!
This past week I baked a delicious chocolate layer cake and iced it in delicate Swiss meringue buttercream. To this I attached royal icing cookies in the shapes of hearts and letters along the sides of the cake, and on the top.
Take a look at how easy, yet showstopping a cookie layer cake like this can be.

The royal icing recipe and the sugar cookie recipe are from yours truly. Do a quick search on the blog for those recipes. Use heart-shaped cookie cutters (I used my Martha by Mail Hearts Set) in whatever sizes you wish, and cut out as many as you think you're going to need. Take my advice and cut extra. For the letters, I turned to the Martha by Mail Alphabet Set in our pantry, and cut out my friend's nickname, not once, but twice. I wanted the cake to have 'Bubbles' all around the cake, and since I was thinking of baking a large 10" round cake, I wanted to make sure it was completely covered in cookies.
Leave the royal icing white, and quickly outline and flood your cookies. Using rainbow nonpareils, sprinkle as many as you want on each cookie while the icing is wet. Set them aside to dry completely.
Note: do not freeze iced cookies with these rainbow nonpareils because they will bleed upon thawing. It's best to store the cookies at room temperature (tightly sealed) for up to two weeks if necessary.

The rich, yet light chocolate cake recipe comes from Martha Stewart. It's her 'One Bowl Chocolate Cake' recipe which is always outstanding and very easy to make. For the surprise birthday cake, I baked a double batch of the recipe and divided it between two 10x2" round cake pans. These baked at 350F for approximately 45 minutes.
The Swiss Meringue Buttercream is also from Martha. I like to use the larger quantity version because it's best to have extra and not run out. Any leftover Swiss meringue buttercream can be frozen for a later date.

Once the cakes have cooled sufficiently, pop them in the refrigerator to chill and begin making your buttercream. As soon as the buttercream is ready, take the cake layers out, and place one of the layers onto a cake decorating turntable. Add a good amount of buttercream to the top of the layer, and then gently sandwich the other layer on top of that, making sure that the layers are centered. Quickly give the entire layer cake a crumb coating. You can then chill the cake for about 30 minutes. The buttercream can stay out in a cool spot, covered with plastic wrap. Once the crumb coating is chilled, frost the entire cake, applying the buttercream either in one smooth coat, or having it textured as you wish. The top of this cake was embellished with stars using a large Wilton 1E piping tip. I then added all of my hearts cookies facing in one direction. The letters were then gently added all around the cake.

You can see the back of the cake. It too spells out 'Bubbles'.

I simply adored making this cake because it was for a very special person. Everyone who saw it at work said that it looked too pretty to eat. But, do you know what I thought?

I thought it was too good not to dig into as soon as I was done photographing it. :-) By the way, my friend Kelly loved every bit of it.
Happy Birthday Bubbles!
Great advice; BEAUTIFUL cake.Happy birthday, bubbles.
ReplyDelete