Tweets galore! An entire flock of pastel-colored cookies recently hatched in my Pennsylvania kitchen just in time for Easter. The charming little birds are sweet edibles that any child will want to have in his or her Easter basket this holiday. For those who enjoy baking cookies by the dozens, nothing could be easier than making a large batch of these tiny cutie pies if you happen to have a good recipe for a shortbread or sugar cookie, and a bit of royal icing to give them their wonderful coats. Adding sanding sugar to gild the lily is well worth the effort, because the whimsical cookies are bound to get lots of buzz with both kids and adults alike once they realize how good they really are.
For my Easter Hatchling Cookies I used a favorite shortbread recipe of mine that was given to me by a dear friend, because it bakes up beautifully. To make them even more adorable, I iced them, gave them bunny corn beaks, set luster candy eyes on each one and flocked their bodies with fine sanding sugar in various festive colors.
Go through my clear, yet simple step-by-step instructions on how to create the little birds at home for your loved ones. As soon as the cookie decorations have dried you can wrap them either as a single treat or as a cute duo in clear cellophane bags. Tie each bag with a gorgeous ribbon or some colorful twine to complete the gift. Add them to a kid’s basket along with other tasty treats or hand them out as favors at your Easter luncheon. By the way, the cookies are equally suitable for a child’s first birthday party or even for a special baby shower. Remember these little cookies for your next celebration.
Happy Baking!
Cookie Decorating Ingredients
- Fine sanding sugars in pink, yellow, lavender and green. To make it easier to decorate the cookies, I placed the sugars in small bowls with teaspoons; this makes flocking a breeze.
- Bunny corn was divided by color into small bowls (bags come in mixed colors).
- Luster ball candies were also given their own bowl; these can be found at any cake decorating supply store.
- Royal icing (white or tinted) in a pastry bag fitted with a number #4 piping tip is sitting in a glass with a damp paper towel on the bottom to prevent the tip from drying up.
- Shortbread Cookies, Brown Sugar Cookies, Chocolate Cookies or other sugar cookie, baked & cooled.
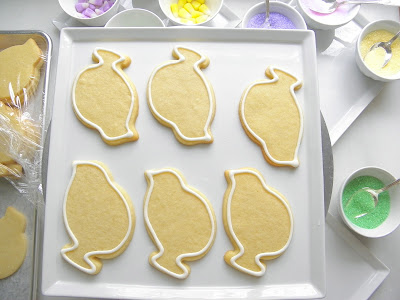
To make quick work of icing the cookies I placed 6 little birds on a square plate. I started off by tracing the shape of each cookie with a bead of royal icing to contain the floodwork.
It's a good thing to put the plate on top of a cake decorating turntable (lazy susan) so that you can easily turn the plate if you need to ice the cookies from a different angle.
Go back and flood each cookie with the same icing. I squeeze icing all over the surface of the cookie making sure I distribute it throughout the cookie.
Working quickly, use a toothpick to drag the icing over any gaps. I coax it along until it settles.
While the icing is still wet, carefully place a bunny corn on top of the icing so that you have a perky beak. Add a little luster candy for the eye.
With the teaspoon, quickly flock the cookie with sanding sugar to cover the entire surface. I let the sugar settle for about a couple of minutes and then gently lift the cookie to remove any excess.
Here is another cookie in a pastel yellow. If you notice, I'm working over a rimmed plate to catch the sugar when I shake off the excess. The leftover sugar is put back into the small work bowl. No waste!
A lavender-colored Easter Hatchling.
Spring Green Birdie!
This bright pink motif is going to my niece. She's going to love them!
You can serve the cookies from a cake stand or plate if you wish. These are sitting on one of my prized jadeite cake stands.
Aren't they adorable?
I decided to pair off the cookies in clear cellophane bags tied with Easter green cotton twine. Sitting here on this antique 19th century ironstone platter, they can serve as favors for a special celebration.
The charming little fellows will be adored by everyone.
Make a lot of them!
Chirp Chirp
Happy Easter Everyone!


Chirp, Chirp, indeed!
ReplyDeleteBeautiful (again, still, always!) cookies, David! You have such a way of making everything look so delicate and sophisticated and, lovely to boot!!
Happy Easter, dear friend!
xo
You're too nice Janet. Thank You! I try my best to create nice cookies (maybe not as nice as yours!).
ReplyDeleteHappy Easter!
These are beautiful! And I love them on your jadeite cake stand! Would love to see a post about jadeite sometime, I'm a huge fan of it. WIll try the cookies!
ReplyDeleteHow cute are these in their lovely Easter colours with their little bunny corn beaks!
ReplyDeleteNick: Thank You! I hope you do attempt some of them this week because they're so easy. As for the jadeite cake stand, I love the trio from MBM. You know, maybe I should do a jadeite piece for readers. Thanks!
ReplyDeletePaula: I know! It occurred to me to make them when someone gave me bags of bunny corn. I thought to myself: "what am I going to do with these?" Then it came to me. Thanks!
~David
Excellent, Carol!!
ReplyDeleteFlocking is among the easiest of decorations for iced cookies.
Let me know what you're baking and decorating.
~David
Hi there,
ReplyDeleteThose Easter Candy Corn candies can be found at just about any drug store or supermarket. They come in little packets (think small bags of jelly beans) and are usually displayed with the rest of the Easter candy.
Enjoy!